Friday, August 12, 2011

Hanging in there

Wow, I can't believe it's been over a month since I've updated this site, so if anyone's still checking up on our progress thanks for your patience!  Things have been progressing a little slower recently for a few reasons...First work's been very busy, money's been tight (surprise, right?) and we've had some of the more boring tasks done like getting the electrical service upgraded and the kitchen rewired.


Even though we haven't had big changes visually, we know the project's still moving along so we can't be too bummed.  I imagine this is the time during most of these undertakings that people either A) get tired of the project and lose interest, B) run out of money and have to sell the place, or C) get divorced.  You think I'm kidding about the last one but I was following a blog just like ours recently and that's how it ended!  But we're still cruising along just fine and always have our minds focused on the finished line...it'll just take some time to get there.


And now in no particular order here are some things that have happened over the last five weeks:


Another day and another skill learned...this time learning how to patch tongue and groove flooring.  This line down the hallway was actually where a wall used to be, but unfortunately is now right down the middle.  So, it was another trip to Caravati's to pick up some old heart pine flooring.  This stuff is expensive but well worth it since we want it to blend with the existing wood.


The two ugly entry doors have finally been replace by these antique, formerly pocket doors.  They're eight feet tall and about 100+ pounds each so we left it up to the contractor to take care of it.  We'll handle hanging the interior doors.  We've also just bought marble tile for the foyer...a nice original looking pattern with white and black marble.


A close-up shot of the handle set we chose.  They're very heavy and good quality which matches the door perfectly.


Before we can lay the tile we had to install cement backer board.  Of course the floor wasn't very level but like everything on this house we work with what's there.  Hopefully in a couple weeks we'll have pictures of the new tile.


Sarah's been working on the new (old) back door for the downstairs.  All the paint was stripped, one pane replaced, the door primed and painted the same red color as the front door.


Sarah's brother Tommy came to help again and helped out Sarah with the doors.  These came from a house in the Fan, built around 1925.  So, I guess for this house they're relatively new.  They're nice, heavy solid wood doors and should give the house a quality feel to it.


Sarah always make sure to stay protected from lead paint.


I installed this window-well under the house for a couple reasons.  In the upper left you'll see the footing for the new columns we just put in and where I am there's an access door for the crawl space.  The soil was falling into the cavity near the door, pushing the door out but more importantly falling away from the footing.  So rather than have the footing move a year from now we installed this window well which will keep the soil in place and give clear access to the crawl space door.


Can't wait for the fall...it was about 100 degrees that day!


Monday, July 4, 2011

Too late and too tired to write much tonight so I'll let the pictures do the talking...


Sarah's brother Tommy came over a few weekends ago to help take out the floor in the living room (and by help I mean do most of the work).  We'd noticed the floor had a good bounce to it the first time we saw the house and always wanted to find out why.


Mystery picture of the day...Sarah pulled this out from under the floor.....guesses???  So you think it's an old towel.  Hmm maybe even an animal?  An opossum?  Wrong, it's TWO opossums... mummified together.  Needless to say Sarah was grossed out.


Our contractor put in one of the doors reclaimed from another house renovation.  These things are 8 feet tall and weigh a ton.  The other one should go in sometime next week.


And a view of the door from the interior.  You can see how much light it brings into what was a dark hallway. Sarah worked on tearing out the old carpet and pulling up the "tackless" strips, which ironically have more tacks than anything on the planet.  There's quite a bit of patching that needs to be done to the floor...luckily there's a place in town with a huge amount of old heart pine flooring.


Here's the living room floor after the repairs.  We added blocking and a good dose of liquid nails down the middle which greatly reduced the bounce so everything's nice and rigid.  I also got to do my first plumbing repair to a drain pipe and so far so good.


And I'll end with this shot of our work gloves.  Believe it or not they're the exact same type of glove, but the ones at the top were bought in August of 2010 and have been used every weekend since then.  Beaten up, worn through and missing some finger tips, but hey they're comfortable.

Time to break in some new ones for the next year...

Sunday, June 12, 2011

This past weekend was one of the most productive two days we've had so far on this renovation.  Usually a regular weekend just isn't long enough to get anything big accomplished, but with the help of our contractor we finally checked a major item off the list.


Ever since we first saw this place the one thing we had on our mind was to remove a wall between the living room and kitchen on the lower level (where we'll permanently live).  This job had been pushed back because of a number of things and also it just wasn't an essential item.  We've progressed on the rest of the house enough where it finally made sense to spend the money on this.  While we worked on other areas of the house the contractor built a temporary wall to support the floor and wall above, and then began knocking out the studs one by one.  I'll let the pictures tell the rest...


The temporary wall is in and a few of the original studs are already out.


The LVL's beams are laminated sheets of plywood glued together.  There are two of them and they need to go in one at a time.


One is in, now it's time for the other.


The beam is up, the columns in and the wall is GONE!


There was some other work being done too...Sarah stripped the paint from the front doors...


...and here are the doors after a fresh coat of paint.


And of course we finished one project but started another.  We exposed the back of the brick chimney which aligns with the center of the room.  It'll take some work to get it nice looking but should be worth it in the end.  You can also see the refurbished doors under the tarp to the left that will be installed in the front foyer....AND the nasty carpet is finally gone from this room....only two rooms left!

Monday, May 30, 2011

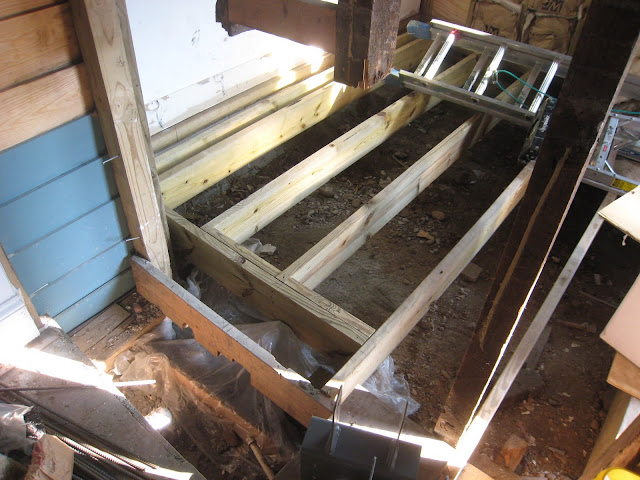
Well this past weekend (actually five days since last Thursday) was super productive.  Sarah and I managed to fit in a little fun with a kayaking trip and a bbq with some friends, but this break was mostly about getting a good chunk of work done downstairs.  The contractor was also back to help, and he took care of pouring the footings for the columns holding the wall we're taking out, and adding new floor joists to the kitchen.  Sarah and I finally got the permit from the city, had an inspection for the footings and spent the first day or two working outside on the porch.  Sunday and Monday we focused on refinishing the doors going into the front foyer.  This was no small task...first we had to remove all the window stops, scrape all the loose paint, fill any holes, get new glass cut, install the glass, replace all the stops and finally prime and paint.  These doors are going to be the finishing touch to the foyer so spending so much time on one task wasn't all so bad.

Here's one of the doors...and this was after spending a day working on them.  Unfortunately the drunk Irishman who built the door 100 years ago didn't make all the lites the same size.


Sarah working hard on the door trim pieces.  We have to wear respirators for a lot of the work since there's lead paint everywhere.


And here are the doors after two days working on them (in 95 degree heat and humidity).  The last thing to do is scrape the paint from the glass and then we are DONE.


This is the temporary wall the contractor built to shore up the floor above.  Some of the studs had to be removed to pour the new footing.


The new footing's covered in plastic on the bottom left.  All the joists there are brand new and we can finally see some semblance of a kitchen floor!


Another side project from this weekend was to create new corbels for the front porch to replace rotten ones. We used the originals to create a template...and saved several hundred $$ in the process.

Monday, May 23, 2011

This past Sunday (after the big wedding on Saturday) Sarah and I continued working on the front porch, hoping that it'd be a day of just painting.   But as is the case with these old houses, the simple painting project turned into a bigger one after we uncovered some significant rot in the porch's box beam.  After tearing out the rotten board and blocking and making a quick Lowe's run we spent the rest of the day cutting, priming and nailing in the new board.  It wasn't as easy as I was thinking and took the rest of the afternoon to finish (plus there's more for next weekend).  When 6:30 came around we were pretty much out of gas so decided to end the weekend with the first barbeque with our new grill.


The bracket on the corner is a complete goner but luckily the column is rot free.


Saturday, May 14, 2011

One of the main things we wanted to fix with this house is the front entry area.  Right now it's, well, about as inviting as a funeral home...dark, with ugly doors and no character.  We've been shopping around for doors for a while but never found anything that really excited us, and the price of new doors can be pretty outrageous.  A few weeks ago while talking with a coworker who just recently renovated an old house, we were offered a chance to pick through some old doors they didn't need.  We ended up with a few solid wood doors...a 24" we can use for the bathroom, and two 32" for the two bedrooms.  The biggest find was two pocket doors, with each leaf 36" wide and 8 feet tall and glass inserts they can make the perfect front doors into each apartment.  But of course with everything there's work involved, from sanding and scraping to replacing the broken glass, but it'll be worth it in the end.


This one actually has most of the glass still left...the other only has one pane left.

Today we finally finished the majority of the exterior painting that we have to do, so now all that's left is to finish up the front porch and the window trim around the house.  We finished painting the siding on one side just in time for a huge thunderstorm....hopefully the paint dried in time!

Tuesday, April 5, 2011

Another Day, Another Find

While cleaning up outside around the house this past weekend we noticed the bottom of a bottle poking out of the ground.  After a few minutes of digging we pulled out this cool milk bottle from the Richmond Dairy Company.  Who knows how old it is, but this was back when milk was still delivered to your door and is another reminder of the history of our area.  There must be so much that lies buried around the house, so hopefully we'll uncover some more things as the renovation continues out into the back yard.


Here it is after removing the dirt and grime.  The glass must be at least 1/4" thick.


And here's where it came from, the Richmond Dairy has now been converted to loft apartments I think. You can see it's the exact same shape and logo as the little bottle.


We've been doing a lot of other things around the house that are relatively low cost, mostly painting.  So far the front is done except for the porch, the back area around the kitchen and the new window is painted and about half of one side.


A couple weekends ago we finally got down to the task of rebuilding one of the hearths upstairs which had busted up bricks that were uneven, and a gap about 4 inches between the bricks and mantle...so in short it looked terrible!  We removed all the bricks and cleaned the ones that were salvageable, and then removed all the sand that was beneath them (including a 1926 Mercury dime).  Since the fireplace will not be used again, and since the house has settled a bit unevenly, we decided to not replace the sand but to build up the cavity under the bricks with scrap wood.  This let us fairly easily correct the unevenness and provide a nice even brick reveal all around.


This shows how much the floors have settled...this cavity was filled with sand and then the bricks on top.


A 1926 Mercury dime was buried in the sand.  It seems old but our house had already been around for 30+ years.  It's also close to the year of the clawfoot tub (1928), so it makes you wonder if some remodelling was done on the house around this time.


It took quite a bit of work to get the platform all nice and even around each side, but eventually we got a nice 1/2" reveal all around.  The gap between the mantle and bricks, which used to be about 4 inches, is now much smaller.  Best tool of the day: Rubber Mallet


Even though we really liked the look of the natural brick, we decided to paint them.  The hearth in the other room had been painted in the past, and to make everything match we painted everything the same dark brown color (we also used this color to paint the stair hand rail)


It's hard to believe it all looked like this just a few months ago.